VS Code: Installing Github Copilot
The VS Code GitHub Copilot extension is an AI developer tool powered by a special version of GPT-4 that has been trained on a large body of public source code. Copilot provides autocomplete-style suggestions as you write code. You can prompt Copilot to generate code on your behalf by starting to write the code you need or by writing a natural language comment describing what you want your code to do.
❗ In order to use GitHub Copilot you need to sign up for a free GitHub account and apply for the GitHub Student Developer Pack. Signing up for GitHub and applying for the Student Developer Pack is optional for SI 506. This is because you must provide GitHub (i.e., Microsoft) with proof of your current student status. If uploading an image of your U-M student ID (or other proof of current enrollment) to a third-party AI provider makes you uncomfortable, then set this recommendation aside. You can always use UMGPT if you’d like to leverage a generative Pre-trained Transformer (GPT).
1.0 Gotchas
Github may reject your application for the following reasons:
-
Name mismatch: Whatever proof you provide to GitHub of your current academic status (e.g., photo of your student id) you must complete both your user profile and your billing information using the same full name used to establish proof of your academic affiliation.
💡 Although using GitHub Copilot is free to students, Github requires that you provide billing information nonetheless.
-
Two Factor Authentication not configured: You must secure your GitHub account by enabling two factor authentication (2FA). After enabling 2FA you may need to log out/log in to GitHub before you apply/reapply for the Student Develop Pack.
💡 See these instructions to configure 2FA.
-
Image source: GitHub wants you to use your “device camera” to submit proof of your academic affiliation. Consider using your phone’s camera to capture an image of your student id.
2.0 Apply for GitHub’s Student Developer Pack
💡 If you already possess a GitHub account, go to
https://education.github.com/pack/. Then skip to paragraph 4
below.
-
Create a free GitHub account. Go to https://github.com/signup/. Provide your email address, password, username, and notificiation preferences. Follow the steps to verify your account.
❗ When creating your account employ the same full name as appears on your student id or other document that you intend to submit to GitHub as proof of your current academic affiliation. Designate your
< uniqname >@umich.eduemail address as the account’s primary address. -
After successful verification click the “Create account”. You will then be prompted to answer the following questions:
-
How would you describe yourself? Select “Student”.
-
How many team members will be working with you? Select “Just me”.
-
What specific features are you interested in using? Select “Collaborative coding” and any of the other options that Github lists that interest you.
-
-
On the “Learn to ship software like a pro” page click the “Apply for your Github student benefits” button (below the “Get additional student benefits”). You will be redirected to the GitHub Student Developer Pack page.
-
On the “GitHub Student Developer Pack” page click the “Sign up for Student Developer Pack” button.
-
On the “Access free GitHub Education benefits” page, select the student role (if not auto-selected) and then scroll down the page to the “Application” form. Confirm that Github has verified your U-M email address then click the “Select this school” button.
-
Next, click the “Continue” button. GitHub will prompt you to share your location. Click “allow” in the pop-up window.
-
On the “Upload proof of your academic status” page upload proof of your current academic status. I recommend that you submit an image of your student ID. After uploading proof of your status, click the “Process my application” button.
You will receive an email from GitHub when your application has been approved. Review and approval is not instantaneous: it may take less than an hour but could take up to
10days.
3.0 Application rejection
If GitHub rejects your application, review the reasons provided—an FAQ is also available—resolve the issues, and resubmit your application. If you fail a second time send a direct message to Anthony (arwhyte) via Slack and include a screenshot of your rejection email.
4.0 Install VS Code’s GitHub Copilot Extension
💡 If you have yet to install VS Code please see our install guides at https://si506.org/guides/.
-
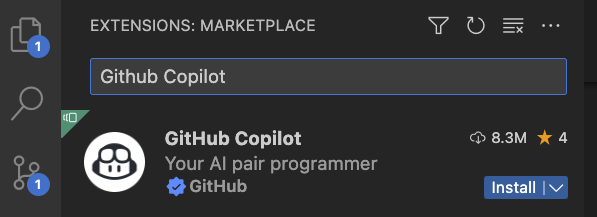
Start VS Code and then click the “Extensions” icon in the Activity Bar (left side) to open the extensions panel. In the search box type the name of the extension “Github Copilot”. After the extension is retrieved, click the extension’s blue “Install” button.

-
If you have yet to permit VS Code to access your GitHub account you will be prompted to do so after installing the extension. Click the “Sign in to Github” button and then click the “Authorize Visual Studio Code” button in the pop up window.


